Quantcast
Channel: Tied with a Bouw
Viewing all 89 articles
Browse latest View live

Baking with Mrs Bouw: Home Made Falafels!

$
0
0


I remember the very first time I made these for Mr B he was rather sceptical. But now, months later, he considers it a treat meal and last night he even said they're just as good as eating a burger! This says a lot coming from a meat lover! My take on the tasty and wholesome falafel is a little healthier than some versions as I only lightly fry them as opposed to deep frying. I like to cook them in advance as they taste even better once they've had time to sit a little. They can be kept in the fridge for a number of days and I can't see why you couldn't freeze them but they never last long enough in our house! Falafels make such a great lunch or dinner (and a super quick one if you've prepared them in advance!) and you can really serve them with whatever takes your fancy. My favourite way is in a wholemeal wrap with baby spinach, a drizzle of sweet chilli sauce and a dollop of tzatziki (pictured below)... yum! Happy falafel making my friends :)
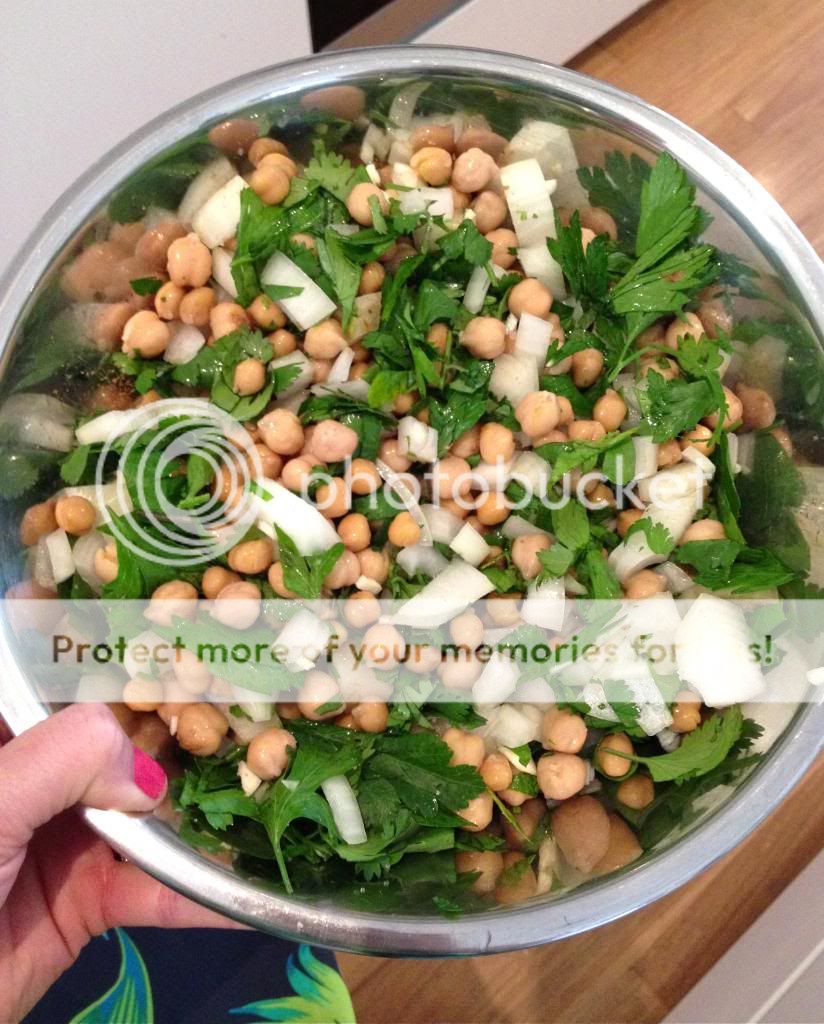
 

Home made falafels

Ingredients

2 x 400g cans chickpeas, drained, rinsed
1 brown onion, chopped
2 garlic cloves, chopped
1 cup fresh coriander, chopped
1 cup fresh continental parsley leaves, chopped
1 teaspoon ground cumin
1/3 cup plain flour
1 eggwhite
1 tablespoon olive oil
Salt and pepper to taste
Yoghurt or tzatziki, to serve.

Method

- Place chickpeas, onion, garlic, coriander, parsley, cumin, flour, eggwhite, salt and pepper in a large bowl and toss ingredients together.

- Place mix into food processor in batches (I find it's much quicker this way and stops your food processor from clogging up) and process until smooth.

- Using floured hands, shape the mixture into 2cm thick patties and place on a plate. I usually get about 10 patties out of this recipe but I guess you can make them as big or as small as you please.

- Cover and refrigerate for 30 minutes.

- Heat oil in a large frying pan over medium heat. Cook patties for 5 minutes on each side or until cooked through and slightly browned.

- Serve with salad and yoghurt or my favourite way is in a wholemeal wrap with baby spinach, a drizzle of sweet chilli sauce and a dollop of tzatziki.

- Enjoy!
 

Baking with Mrs Bouw: Sticky Date Pudding with Butterscotch Sauce!

$
0
0


Who doesn't love sticky date pudding, right?! It's hard to pass up a slice of this yummy dessert any time of year but there's just something about the word 'pudding' that screams 'Christmas' isn't there?! I have made two in the last week! I love this recipe. Like most of the recipes I post, it is super easy and so convenient to be able to make it a day or so in advance with minimal fuss when it comes to serving it! And that part is almost as good as eating it... scooping the ice-cream (scoffing a few sneaky spoonfuls as you go) and drizzling the sticky, sweet butterscotch sauce over the pudding... yum yum yum! Happy baking my friends! x 

Sticky Date Pudding with Butterscotch Sauce

Ingredients

1 3/4 cups deseeded dried dates
1 1/4 cups water
1 teaspoon bicarbonate of soda
60g butter, roughly chopped
2 large eggs
1 teaspoon vanilla extract
1 1/4 cups self-raising flour
2/3 cup, firmly packed brown sugar

Butterscotch Sauce

3/4 cup (firmly packed) brown sugar
300ml cream (but be at least 35 to 40 percent fat)
1 1/2 tablespoons golden syrup
25g butter 


Method

- Place dates and water in a small saucepan over high heat. When the mixture starts to boil, add bicarbonate of soda and butter, and remove from the heat. Stir and then set aside for 20 minutes (or until cooled). The butter will melt during this time.

- Preheat oven to 180 degrees Celsius (160 degrees Celsius fan-forced).

- Grease a 20cm diameter round springform pan and line the base and sides with baking paper.

- Place cooled date mixture in a food processor. Pulse mixture a few times to form a chunky paste.


- Add eggs and vanilla to date mixture and pulse a couple of times until just combined.

- Stir flour and 150g (2/3 cup, firmly packed) brown sugar together in a medium bowl. Use the back of the spoon to break up any lumps of brown sugar. Add date mixture to the flour mixture and gently fold the ingredients together until just combined.

- Pour batter into prepared pan.

Bake the pudding for about 50-60 minutes, or until cooked when tested with a skewer. The pudding should spring back when lightly pressed in the centre. Note: if the pudding starts to over-brown whilst baking, loosely cover it with greaseproof paper or piece of foil.

- Begin making the sauce (see instructions below) about 10 minutes before the pudding has finished baking.


- Leave pudding in the pan and allow it to cool for 10 minutes on a wire rack. Using a skewer, pierce several deep holes in the pudding. Pour about 125ml (1/2 cup) of the hot butterscotch sauce over the pudding. Allow to stand for 5 minutes before removing from the pan.


- Set the remainder of the sauce to the side until right before serving. The sauce can be stored in the fridge (or freezer) and easily reheated.

- To serve, cut a slice of pudding, place it on a plate and drizzle with the butterscotch sauce with a scoop of vanilla icing on the side.

Butterscotch Sauce
Place sauce ingredients in a small saucepan. Stir mixture over medium to medium-high heat until the mixture comes to the simmer. Reduce heat and simmer for 5 minutes, stirring occasionally.


- Enjoy!

Get the Look: Bummy yummy Mummy!

$
0
0
Being a busy, full-time stay at home Mumma of two, at the end of most days I feel like I've run a mini marathon (heck, sometimes I feel that way and it's not even lunchtime!) and I know there are many of you who can relate to this! Some mornings, finding the time to piece together an outfit seems almost impossible and after pulling clothes on and off again only to feel 'blurgh' in most of them, I find myself reaching for my trusty leggings and a comfy tee. And who am I kidding, they are more comfortable than anything else in my wardrobe and much more practical with kiddies and all that pram pushing anyway! BUT, who says the 'bummy mummy' option can't also mean the 'yummy mummy' option! You can most definitely feel both comfortable and stylish if you invest in just a few staple items.

So, I thought I'd share with you a few keys pieces in my 'bummy mummy' wardrobe! It pays to invest in a pair of runners/sneakers that are not only comfortable but a pair that you also get excited about wearing! My Mizuno's are by far my favourite pair of runners I have ever owned (both comfort and aesthetically) and the colours really jazz up an otherwise pretty boring outfit. I am also loving my new Seed metallic sneakers! They seem to go with absolutely everything and are super comfy and so easy to slip on when you are rushing out the door! Sports caps are great for those days where I haven't had time to wash my hair and my roots are looking a little oily. The last item on my 'must have' list are my trusty Topshop leggings... they are seriously THE comfiest leggings I have EVER owned (I think I have about 8 pairs) and they are the ONLY leggings I will buy now.

Get the look:

High waisted extra long leggings from Topshop
Mizuno Wave Elixr 8 from Shopstyle
Nike Signal Tee from The Iconic
Metallic Amber sneakers from Seed
Pink Nike cap from The Iconic

Get the look: The Cartel & Willow Cape Two Ways!

$
0
0
What better way to embrace Australia Day than to support local Australian brands! Cartel & Willow launched their label just last month and yesterday I wore my new 'Pink Shanti Zebra Cape' for the first time. Along with the delicious lolly pink animal print (it comes in other colours too!), I love the lightweight fabric of this piece and it's versatility. So much so that I thought I would show how it can be dressed up and dressed down giving two totally different looks simply by throwing your hair into a pony, changing one item of clothing and slipping off your heels in exchange for your sneakers! 

Get the look!

Dressed down:

Pink Zebra Shanti Cape from Cartel & Willow
My basic white tee was only $3.00 (yes, $3.00!) from Kmart but you can find similar at Witchery.
Metallic 'Amber' sneakers from Seed Heritage
My studded belt is an oldie but you can find similar from The Iconic
My denim cutoffs are also a few season old but you can find similar again also from The Iconic
'Brights Power' nail polish from OPI
Morange lippy from MAC


Dressed up:

Pink Zebra Shanti Cape from Cartel & Willow
Luxe sateen super skinny jeans in black from J Brand
My scoop neck white tshirt was only $3.00 (yes, $3.00!) from Kmart but you can find similar at here from Witchery.
My Country Road wedges are a few seasons old but you can find similar here at Witchery
My studded belt is an oldie but you can find similar from The Iconic
'Brights Power' nail polish from OPI
Morange lippy from MAC 

Happy Shopping my friends! x

Get the Look: Indiana Bambino!

$
0
0
Some of you may already know that I am a huge fan of the fabulous Australian Brand 'Indiana by Freda'. Well, have you seen the new Indiana Bambino range for kids?! Ummm, it is possibly better than the woman's range! Seriously, I wish it all came in my size. Below you will see my girls looking just so beautiful in a few of pieces from the Indiana Bambino line...
         Go on... what are you waiting for?! Go and check out Indiana by Freda's website! I received an amazing new item from next seasons woman's autumn/winter range in todays post that I will share with you later in the week... I almost died when I opened it... it is heaven!!! Happy shopping my friends :) xxx

Baking with Mrs Bouw: Chicken San Choy Bow!

$
0
0

Earlier in the week it was that time of the month again... yes, that's right, time for my monthly ladies Cooking Club! For those who haven't seen my previous post about this, basically, our Cooking Club consists of a groups of us Mumma friends who get together on a monthly basis (we lock in the second Tuesday night of every month) to enjoy good (homemade!) food, good wine and great company (and with the extra luxury of it being kiddie free)! The dinner is hosted by someone else each month and they set the theme! This months theme was 'Finger food' so I chose to make a crowd pleaser and something that was also easy to whip up after I had done my girl's dinner, bath and bedtime ritual also allowing me time to slip out of by bummy Mummy clothes and pop on some lippy! Who doesn't like a crispy cup of lettuce filled with delicious asian flavours?! Happy Cooking my friends :) x


Chicken San Choy Bow

Ingredients

10 iceberg lettuce leaves (I always like to buy two heads of lettuce just to be on the safe side as it's not guaranteed that all leaves inside will be in tact)
2 tsp vegetable oil
4 green onions (shallots), finely sliced
2 tsp fresh grated ginger
2 gloves garlic
500g chicken mince
3 tbs hoisin sauce
3 tbs kecap manis
1 tbs soy sauce
1 tsp sesame oil
230g can water chestnuts, drained and chopped
1 packet Changs Original Fried Noodles

Method

- Carefully remove lettuce leaves so that they remain in tact. Using scissors, cut them into a round dish-like shape. Place in the fridge, covered, until required.

- Heat vegetable oil in a pan/wok on high. Stir-fry green onion, garlic and ginger for 1-2 minutes. Add chicken mince and cook for about 5 minutes, until colour changes.

- Add hoisin, soy sauce, keycap manis, sesame oil and water chestnuts and continue to stir-fry for another 3-4 minutes. Stir until sauce is completely combined with chicken mixture and then transfers immediately to a serving bowl.

- Arrange lettuce cups on a platter. Spoon a little chicken mixture into each leaf, drizzle a little extra keycap manis and top with a sprinkle of fried noodles to serve.

- Enjoy! :)
 

Get the Look: The Animalia Blazer and Leather Look Mini!

$
0
0
 I don't get out at night all that often these days, so when Mr B and I locked in date night to celebrate Valentines Day, I knew it was the perfect opportunity to wear my new Casablanca 'Animalia' blazer by Indiana by Freda.... because there's nothing sexier than a bit of animal print right?! ;) I now own three of Indiana by Freda's amazing blazers (one in a floral print which I posted about here, one in black and now this one) because they are seriously such a great cut! I just love the structure of the slightly padded shoulders, the three quarter sleeves AND the fact that they can be dressed up or down. With the weather in Sydney being so sticky and humid of late, I didn't want to wear pants and given us ladies 'never have anything to wear!' (right? haha) I hit the shops last week in search of something to team up with my sassy new blazer! I must admit this Country Road skirt didn't look much on the hanger (especially given it is an a-line style) but as soon as I slipped it on I fell in love! It is super soft, super comfy and hugs in all the right places... and for an item that will now become a staple in my wardrobe, it cost under $100! Needless to say I came home from the shops one happy Valentine :) And honestly, it's not often that I feel truly sexy but this skirt and blazer combo (along with some red hot lippy of course) did the trick and was certainly a welcomed change from my usual 'Mummy' uniform...
  

Get the look:

Casablanca 'Animalia' Blazer from Indiana by Freda
Leather look A-line skirt from Country Road
'Mod about you' nail polish by OPI available here
Zigzag ring from Louis Vuitton
Shoes (exact pair no longer available) but still sell similar at Tony Bianco
Grand Apparat bangle from Hermes
'Lady Danger' lipstick from MAC cosmetics

Get the look: The top knot!

$
0
0

Just over a year ago I had a disgusting experience at a local salon (I'll spare you the long and traumatic story!) which in return saw me master the 'top knot'. I've had several requests over the months to do a 'how to' post on how to achieve the perfect top knot, however, I was a little hesitant as I wasn't sure how many people would be interested or able to follow my tutorial as I appreciate not everyone has hair long enough to achieve this without using a hair donut. But, with a few more request from lovely Instafriends in recent weeks, I thought I'd share my super easy (and super quick) way of achieving this go-to 'do' for every occasion! P.S excuse the dodgy bathroom selfies... Allegra hasn't quite mastered photography :)
Get the look:

1: Start by brushing your hair, then tie it up into a high ponytail. I have quite a lot of hair so to ensure it is super secure I like to use x2 thick hair ties.

2: You can choose to skip step 2, however, I prefer a bit of height so using a tail comb I gently lift the front section of my hair bit by bit until it is even and at a desired height.

3: Can you see the difference between image 1 & 3?! Being a busy and active Mum (especially in the humid weather) this high pony tail is my hairstyle of choice during the week.

4. Pulling your pony tail over one shoulder (I always pull over my right) tease the middle and inner section only, leaving the outer, top of your pony tail and ends neat and smooth. Tease until it's got some good volume and feels like it won't just fall out as soon as you move your hair.

5. Once you've finished teasing, lift up your pony tail towards the front of your head (the teased part of your hear should be on the inside) and twist into a donut-like shape smoothing any uneven hairs as you go. Slip in a few pins as soon as you have your desired shape to hold it before moving to step 6.

6. With the remainder of your hair (which should be your smooth ends only) twist and wrap around at the base of your top know and pin once the last of your pony tail is concealed.

7. Give you hair a decent spray of hairspray and tidy up any messy bits. You may decide to slip in a few extra bobby pins for extra security if you feel like it's not secure enough (I usually achieve this look with as little as 2-3 bobby pins). Enjoy

Baking with Mrs Bouw: Salmon, Avocado and Mango Lettuce Wraps!

$
0
0
Mr B and I will often enjoy a piece of fish (we both love salmon!) served with a yummy salad for dinner. After cooking my San Choy Bow a few weeks back, I was inspired to turn my boring old 'fish and salad' recipe into something a little more fun! We all love eating with our hands don't we?! And using lettuce as a bread/taco/wrap replacement means this meal remains healthy, low carb and ridiculously tasty!    

Salmon, Avocado and Mango Lettuce Wraps

Ingredients

1 Iceberg lettuce
2 salmon fillets (if I can find it in supermarkets I like to buy the fresh salmon glazed in a yummy japanese marinade)
1 large avocado
1 large mango
1/2 bunch fresh coriander
1 small tin of four bean mix, drained and washed
I fresh corn, cooked and carved off the cob
2 tablespoons of pepita and sunflower seeds (these add a healthy crunch but feel free to substitute with cashew nuts or any nut of your choice for that matter)
1 tsp olive oil or butter
Sweet chilli sauce (optional)

Dressing

¼ cup extra virgin olive oil
¼ cup freshly squeezed lemon juice
2 cloves garlic, crushed or finely grated
1 tablespoon honey
Pinch of sea salt

Method

- Carefully remove lettuce leaves so that they remain in tact. Using scissors, cut them into a round dish-like shape. Place in fridge, covered, until required.

- Heat oil/butter in fry pan over medium to high heat. Place the salmon (skin side up if it has skin) in the pan. Cook until golden brown on one side, about 4 minutes. Turn the fish over and turn down heat slightly cooking until it feels firm to touch and both sides have a nice golden, crispy look to them (usually around four minutes).

- Turn off your stove, leave fillets in pan and set aside to cool slightly whilst you assemble the salad.

- Cut up your mango, avocado, coriander (leaves only, no stems) and place in a medium side bowl with your bean mix, corn, pepita and sunflower seeds.

- Combine all ingredients for dressing in a small jar and shake until well combined.

- Dress your salad and then using your hands roughly break up your salmon fillets into nice chunks (the fillets should fall part pretty easily) and add them to your salad.

- Toss all ingredients together and spoon into prepared lettuce wraps.

- Drizzle with sweet chilli sauce and a dollop of egg mayonnaise (Thommy is my fave ~ so bad but so good).

- Enjoy!
 

Baking with Mrs Bouw: Coconut and Date Balls!

$
0
0
This is has to be the easiest and quickest recipe I have ever posted. And one with the least ingredients... two ingredients my friends, yes, only two! I was doing a clean out of the fridge and had half a packet of dates left over from some baking which was uncanny because it was only just yesterday that a friend of mine who has a very fussy little eater who's favourite food is chocolate (isn't it all of ours?! :P) told me of her sneaky way to get some extra fruit into her daughter. You know I'm all for tricking our little ones (do you remember my zucchini spaghetti!) so I was excited to try these little babies on my girls. I whipped them up earlier today in a matter of minutes and they were an absolute hit... seriously my girls were going nuts for them! Allegra even said 'Mum, can I have another chocolate ball please?!' Misson accomplished and perfect for the lunchbox!


Coconut and Date Balls

Ingredients

2 cups of pitted dates, roughly chopped
2 cups of desiccated coconut

Method

- Place dates and one cup of the coconut into a food processor or blender.

- Process on high until the mixture all of a sudden comes together and forms a sticky ball (refer above picture).

- Remove mixture and roll into teaspoon size balls.

- Lastly, roll into the remaining one cup of coconut.

- Pop them in the fridge for an hour or so until they are firm to touch. See, easy peasy!

- Enjoy!
 

Get the look: The Bargain buy dress!

$
0
0
I'm not one to shop online all that often as generally I like to see the product in the flesh first. But, back in January I was ordering a couple of new Nike gym tees from The Iconic and soon found myself immersed in the 'dresses' section. Believe it or not, I hate dress shopping. Just ask Mr B. The poor man has listened to me complain time and time again and has spent many an hour watching me try on dress after dress only to walk away empty handed and deflated. Be it online or instore I find it really hard to find dresses I feel truly comfortable and confident in. However, when I stumbled on the orange Ezra number (above) at only $39.95 and The Iconic's famous '100 day free return' policy I thought what the heck, if it doesn't fit I'll simply send it back. When I first opened the package I'll admit I was underwhelmed BUT once I slipped it on I was amazed that it was the perfect fit and super comfy! So, later that night I jumped back online to order one in black too (because a plain little black sheath can never go astray) and I also ordered three others (all for $39.95 each) in the hope that the sizing would be consistant with the first dress. The very next day I received the second package (and for some reason was still apprehensive and again underwhelmed when I first opened them) but one by one I tried them on and just like when I was a teenager, I did a cheesy little catwalk for my Mum (who was in town visiting) and with every dress her response was 'WOW'! I'll do the math for you my friends, that's five dresses for under $200! I know, what the frock right? hee hee. It just goes to show you don't need to spend big bucks to feel good in a dress!
Teamed with shoes and accessories I already owned, I wore the 'Orange Sheath' dress to a wedding last month and the 'Floral sheath' for a special dinner with friends last Saturday night. Unfortunately I think both have now sold out BUT I have compiled a few of my other favourites below (of which a couple were amongst my second order) all available from The Iconic. Most dresses from the Ezra collection are priced between $30- $40 so the whole collection is definitely worth a good look!
Fluttersleeve tulip dress here
Blue floral sheath here
Assymetrical wrap skirt floral sheath dress here
White with floral tulip dress here
Coral floral sheath here

Happy shopping my friends :)

Get the look: Bright eyed, bronzed & berrylicious!

$
0
0
Having been either pregnant or breastfeeding the previous two winters, this year I am trying to embrace items that I already have in my closet (many of which I was unable to wear the previous two winters) before heading to the stores to shop the latest trends. Last night Mr B and I headed out for dinner with my brother-in-law and his lovely partner and I decided to wear this Arthur Galan khaki pleated frock I picked up on sale when I was pregnant with Anya back in 2012. It is unlike any other dress I own (and not a style I choose to wear all that often) but teamed with the Robert Robert 'Diavolina' boots my Mumma bought me for my Birthday last year, my trusty Arthur Galan mongolian fur vest, some gorgeous, deep berry lippy (perfect for the cooler months!) and a low, slick pony, I felt like I put my own twist on a style that I wouldn't usually feel myself in. In fact, I have only ever worn this dress once before and I wore my hair down with a slight wave. I felt too overdone, frumpy and 'not me'. So last night, simply by opting to go with the slick pony (again, not a hairstyle I often embrace) I felt like I got it right this time! Seeing as all of the items that make up this outfit are no longer available in stores (and a little hard to source similar products) I thought I would instead share the tools of the trade used to create the beauty element of this look and the products I will most likely be turning to this winter for those winter nights out on the town!
 
Get the look:

1. MAC bronzer powder in 'Golden' here
2. Maybelline Full n Soft Mascara in 'Very Black' here
3. Nars blush in 'Orgasm'here
4. Napoleon Auto Pilot pre-foundation skin primer here
5. Napoleon lip pencil in 'Rococo Red'here
6. Napoleon China Doll foundation here
7. Napoleon 'The one' concealer here
8. Inglot lipstick #132 here
9. Inglot nail polish #036 here
10. Napoleon foundation stick here

Baking with Mrs Bouw- Sugar Cookies!

$
0
0

Oh I wish I had have posted this recipe before Easter (because some mini bunny cookies would have been so adorable!) but better late than never right?! I've been meaning to post this recipe since I first baked these gorgeous, sweet little cookies for Allegra and Anya's Joint Birthday Party back in November last year. They were such a hit (and so easy to make) that I made another batch a few weeks later for Christmas! For my girls' party I wanted to create a cookie that would go with their party theme but something that would not take up too much of my time as there was so much else to do and make. Icing cookies is an art and process within itself (something that I hope to be able to master one day) but with time not really on my side I decided to cheat just a little. I baked and iced the cookies myself (I just used a basic royal icing recipe for the icing) and then outsourced the edible toppers from Custom Icing. Once I had a PDF of the images I wanted to use, it was as simple as placing an order online. The service was super quick (I received in the post within a matter of days) and despite being a little overwhelmed when I first read the step by step instructions, the process of removing the toppers from the edible sheets and placing onto my cookies was super easy! I was so thrilled with how they turned out and had so many people comment on them... a small effort for a 'wow' factor! This recipe really is super easy to follow and will make about 30, 2 1/2 inch cookies or 16, 3 1/2 inch cookies. Perfect for any occasion :)


Sugar Cookies
Ingredients
3 cups plain (all-purpose) flour
1 teaspoon baking powder
1 cup unsalted butter, room temperature
1 cup caster sugar
1 large egg
1 teaspoon vanilla extract
Baking paper
Method

Line x2 trays with baking paper.
- In a medium bowl, stir together the flour and baking powder and set aside.
- Place the butter and sugar in the bowl of an electric mixer and using the paddle attachment, cream together until light and creamy.  This should take about 3 minutes.
- Add the egg and vanilla and beat for another minute or so.
- Add the flour mixture one cup at a time (this stops a storm of flour dust!).
- Mix until all of the flour is incorporated and the dough begins to pull away from the sides of the bowl.
- Take the dough out of the bowl and place it on a piece of baking paper.
- Using your hands, knead the dough a few times.
- Place the dough in a large plastic (ziplock) bag and refrigerate for about 2 hours.  If you would like to speed up the chilling process, place the bag of dough in the freezer for about 20-30 minutes (just be sure not to forget to take it out).
- A few minutes before you are due to get the dough out of the fridge or freezer, preheat oven to 180°c.
- Once the dough has chilled and feels firm to touch, take out about half, leaving the rest in the refrigerator until your ready to work with it.
- Place dough between two sheets of lightly floured baking paper. This enables you to roll out the dough without having to add too much additional flour. Adding too much flour can cause the dough to be become a little tough and can also result in pockets of flour which may result in bumpy cookies.
- Roll out the dough to about 1/4 of an inch thick
- Cut the dough with your choice of cookie cutters (I usually use a small circle cutter as it makes gorgeous little bite-sized cookies). Try to make the best use of the dough you’ve rolled out.  Every time you have to re-roll the dough you will need to add a bit more flour resulting in the bumps I mentioned above. 

- Carefully place cookies onto prepared baking sheets. To avoid unevenly baked cookies, be sure to only put cookies of similar size on each baking sheet.  
- Place the entire baking sheet (with cookies on it) in the freezer or refrigerator for about 3-5 minutes.  Chilling the cookies will help ensure they keep their shape while baking. This is one of the best tips I was ever given!
Bake cookies for 8-10 minutes depending on the size of the cookie.  Bake until they are just barely beginning to take on a golden tone.  They will continue to bake as long as they are on the baking tray, so don’t let them get too brown.  Cool for just a minute or so on the tray and then carefully remove cookies from the baking sheet and place on a cooling rack.
- Once cooled, the cookies can be decorated with either frosting, royal icing or rolled fondant. 

- Enjoy! :)


Baking with Mrs Bouw: Basic Cupcakes with Vanilla Buttercream Frosting!

$
0
0
I have had many questions over the months about how to bake and ice the perfect cupcake so I thought I would share the recipes that I use to make basic, fuss free cupcakes along with my buttercream frosting... yum! This is a great go-to recipe when you need to whip some up quickly as the ingredients involved are generally ones you always have in your pantry and fridge and they are just SO simple to make. Now, as for my secrets, well it's pretty simple... get to know your oven and don't be scared to use your better judgement! Whilst cooking times are essential (especially for those who are new to cooking or baking) I don't always believe in following a recipe and it's cooking time exactly. I have lived in several different homes now and have found that even if each oven was set to the exact same temperature, they don't necessarily cook the same. When baking cakes and cupcakes there is a very fine line between being undercooked and overcooked. For example, this recipe suggest cooking the cupcake for 15 minutes. I would suggest you check them with a skewer from the 13 minute mark. If they still seem really runny in the middle don't be fooled as they turn very quickly. Check them again in another minute or so and you will often find that they are almost done. Another thing you need to remember is that they will continue to cook slightly once you remove them from the oven and often this is where the overcooking occurs, resulting in dry cupcakes! As for piping the icing, I'm planning on sharing a video tutorial once we are settled in our new place in Chicago but if you are desperate for some tips in the mean time I'm sure there are plenty already available on youtube ;)

Cupcakes with Vanilla Buttercream Frosting

Ingredients

125g (4 oz) butter, softened
½ cup caster (superfine) sugar
1 teaspoon vanilla extract
2 eggs
1 cup plain (all purpose) flour
2 teaspoons baking powder
¼ cup (2 fl oz) milk
Icing (confectioner’s sugar) for dusting
Paper patty cases


Buttercream Frosting


125g butter, lightly softened (I usually take it out of the fridge half an hour before I plan on using it)
2 1/4 cups icing sugar (I always use CSR 'Pure Icing Sugar' as it is for hard setting icing)
1 teaspoon vanilla essence

Method


- Preheat the oven to 180°c.


- Place the butter, sugar and vanilla in the bowl of an electric mixer and beat until light and creamy.


- Gradually add the eggs and beat well after each addition.


- Add the flour, baking powder and milk and beat well.


- Spoon the mixture into x12 ½ cup capacity muffin tins lined with paper patty cases and bake for 15 minutes or until cooked when tested with a skewer. Set aside to cool (I like to cover mine with a clean tea towel to keep them nice and moist).


Buttercream Frosting


- Place butter in the bowl of an electric mixer and beat for roughly six minutes or until light and creamy.


- Add in icing sugar a half cup at a time and add vanilla half way through (food colouring is optional).


- Beat until well combined at at piping consistency (approximately 5 minutes, you should be able to tell when it's done).


- Ice cupcakes as desired.


- Enjoy! 


Get the look: The Leopard Print Shirt!

$
0
0
It's no secret that animal print is a staple in my wardrobe and this 'Sage Pink Leopard Print' shirt by Cartel & Willow is a new fave! It is so light and comfy, has the most adorable and flattering tuxedo-style tail at the back AND it features my two favourite colours; pink and yellow! On it's own it appears to be more appropriate for spring/summer, however, with the sleeves rolled completely down teamed with some fur and skinny black jeans it is transformed into a great winter ensemble!
 

Get the look:

Cartel & Willow Sage Pink Leopard Print shirt here
J Brand black luxe sateen skinny jeans here
Tory Burch 'Reva' clutch here
Tony Bianco black pumps, similar here
Gold origami chain necklace here
Inglot lipstick #132 here
Inglot nail polish #036 here

Baking with Mrs Bouw: Frozen Yoghurt Buttons!

$
0
0


Ahhh, I'm back! If you've been keeping track of my pics on Instagram you will have seen that we arrived in Chicago late last week and are finally in our apartment! This means one thing... I have a kitchen again, whooo! Given our cupboards are still very bare, it will be another week or so until I have stocked up on all my baking ingredients, so today I am sharing a super easy non-bake recipe! Months ago after sharing a few of Allegra's bento lunches which included yoghurt buttons, I had several people ask me if I had made them. Initially I was like 'Pfft, who do they think I am?!' but then I began seeing a few different recipes floating around the net of a 'frozen' variation (the only downside being that they are not suitable for lunch boxes as they melt like ice-cream) so today Allegra and I decided to give them a go whilst Anya was having her nap. They are super duper easy to make, require just a few ingredients (of which I almost always have in the pantry anyway) and SO much fun for the little ones to get involved! I picked up all the ingredients from my new local Whole Food Market so all of my ingredients (including the food colouring) were natural and organic! Allegra had so much fun mixing the colours into the yoghurt and I think she secretly loved the 'Frozen' element after being obsessed with the movie 'Frozen' for the last few months. As you will see above I served them along with strawberries and blueberries for the girls' dessert tonight and they gobbled up the whole lot and came begging for more... what a delicious, fun and healthy treat! I think these will now be a staple in our freezer :)


Frozen Yoghurt Buttons

Ingredients
Greek yoghurt (if you don't have greek yoghurt any regular yoghurt will do)
Agave nectar (you won't need this is you use regular yoghurt as it will be sweet enough)
Food colouring
Sandwich/snaplock bags (for piping)
Baking paper

Method 

- Line a baking tray with baking paper.

- Divide yoghurt evenly between bowls depending on how many colour variations you would like and add a few drops of the agave nectar to sweeten the yoghurt until it is to your tasting.

- Add 2-3 drops of food colouring and stir until combined.

- Snip a small tip off one on the bottom corners of your snap lock bag/s.

-  Turn the bag inside out and place your hand in like a glove and spoon the mixture into your covered hand.

- Flip the bag inside out and squeeze gently to pipe your buttons.

- Place in the freezer for an hour before using.

- Enjoy! :)


Get the look: Leggings, Laces and Lippy!

$
0
0
Earlier this year I did a post called 'Bummy Yummy Mummy' and let's just say I've upped the anti! Being a busy Mumma and wife (and currently being without a car) you will find me walking (a lot!) so most days due to comfort and practicality more than anything, I reach for the quickest and easiest option... leggings and sneakers! This is by no means the most glamourous of looks but it doesn't mean you have to leave the house feeling drab and frumpy. Some choose to match their nail polish to their handbag so who's to say we can't do the same with our lippies and sneakers?! ;) A bright lip can go a long way and leave you looking and feeling that little bit happier and more confident. AND it gives the impression that you indeed look 'together' when you may in fact have been scrambling to feed two kiddies, get them cleaned up, dressed and out the door hee hee Lipstick may not solve world peace but it does work a whole lotta magic! Smoke and mirrors my friends :)

As for the shoes, go for bold! Choose something fun and punchy to dress up an otherwise boring pair of black leggings or if you are brave enough to have the leggings be your statement piece, than invest in a neutral shoe, black, white and grey is always a safe bet!
 
Eastbay has an enormous range to choose from so I always like to browse online and once I have found a shoe I like I search for stockists that are closest to me. Can you tell I gravitate towards pink, green and orange runners?! ;)  photo Slide1_zpsdf59774c.jpg 1. Nike Free 5.0 from Eastbay 2. Free TR Connect 2 (Grey) from Renarts
3. Mizuno Wave Elixir from Finishline
4. Free TR Connect 2 (Pink) from Nordstrom
5. Nike Luna Racer +3 from Eastbay

Below are five of my absolute fave lippies, all by MAC cosmetics! Number 1, 3 & 5 really pack a punch and numbers  2 & 4 are softer and much more subtle...
     

1. 'Lady Danger' by MAC
2. 'Saint Germaine' by MAC
3. 'Candy Yum Yum' by MAC
4. 'Coral Bliss' by MAC
5. 'Morange' by MAC

And lastly, three examples of amazing leggings. I swear by the black Topshop ones (I have around 6- 8 pairs), I just adore the hydrangea print and most of you have probably already gathered that I love me some animal print :)
1. 'Hydrangea Prana' pants from The Upside
2. 'High waist Extra Long' leggings from Topshop
3. 'Blue Tiger' leggings from Brasilfit

So there you have it, leggings, laces and lippy. Simple, comfy and effortless! xxx


Baking with Mrs Bouw: Home Made Muesli!

$
0
0
Earlier in the year I had gotten into the habit of making my own muesli, however, with packing up our life in Sydney and then spending two months with family in Melbourne before arriving in the US, let's just say home made muesli was not on the top of my list of priorities! ;) However, now that we are relatively settled here in Chicago, I am turning my focus back to a healthier lifestyle for all of us! The main reason I was keen to go back to home made was due to the breakfast products (and food products in general) in the supermarkets here. Without going by what is written on the side of the box and judging with your taste buds alone, the foods are either ridiculously salty (and that's coming from someone who loves salty foods... shhhh) or beyond sweet or BOTH (if that's even possible)?! And given breakfast is the most important meal of the day and can often set our 'eating' tone for the day, you can't beat home made and healthy! This recipe is, quick, super yum and so adaptable so you can tailor it to your personal taste adding or subtracting ingredients as you please, And the best part is knowing exactly what goes into it! I serve this up each morning with fresh fruit, a couple of tablespoons of greek yoghurt and just a splash of low fat milk for a little extra moisture! Oh and this recipe made two medium sized jars (picture below).


Mrs Bouw's Home Made Muesli

Ingredients

3 cups rolled oats
1 cup shredded coconut
3/4 cup mixed dried berries (I use dried blueberries, cranberries, raspberries and raisins)
1/2 cup mixed unsalted nuts, chopped (I used all natural almonds, walnuts and cashews) roughly
2 tsp cinnamon
1/2 cup honey
2 tbs milk
2 tbs coconut oil

Method

- Preheat oven to 180°c.

- Line a large baking tray with baking paper and set aside.

- Place oats, coconut, nuts, mixed berries and cinnamon in a large mixing bowl.

- In a small saucepan, place honey, milk and coconut oil and stir over low heat until combined. This should only take a minute.

- Pour wet ingredients into dry ingredients and mix until well combined.

- Spread mixture evenly onto prepared baking tray and place in the oven. Bake for 20-25 minutes or until golden and slightly crisp (you can bake for longer if you like your muesli super crunchy).

- Set aside to cool before transferring to an airtight container or jar.

- Enjoy! :)

Sorrow shared...

$
0
0
This post is so far left of centre compared to my usual topics but sorrow shared is sorrow halved right? My heart has felt so very heavy these last few weeks. It seems that every second day has brought sad news as I have found myself sending messages of comfort and condolence more often than not. Almost every few days it seems. And then last Thursday, the weight of sorrow became a little too heavy for this usually hopeful, happy heart of mine... and for the first time in a long time, my spirit, and maybe my heart, feels broken.

If you take away the fact that we were holidaying and honeymooning in an incredible part of the world, last Thursday started like most days. I woke before my alarm (because let's face it, once you have kids you won't be needing one for a long while) and like most mornings, I am the filling in an Allegra and Anya sandwich. Knees in the back, legs streched out horizonatlly across my body. But despite all of the discomfort and despite the fear that us parents encounter at the thought of prematurely waking our little ones, there is no where else I would rather have been. I strategically reached for my phone (yep, I've lost all ability to sleep in these days, even if I am dog tired) and opened up the usuals to catch up on what I'd missed over night. I opened up Facebook and was delighted to see a notification from one of my best friends. She always has something funny to tell me, or some kind of lousy gossip that has us emailing back and forth giggling away like we are still the same naughty girls back in high school. But as my eyes skimmed over her words, my brain could not compute what I was reading. I read it again. And again. And again.

This is the same friend who's comforting voice was the first I heard on the other end of the phone fourteen years ago as I sat in the back seat of the car as my Mum drove us home from the hospital. And I remember it like it was yesterday. All of it. I remember the last few weeks. Because despite being given a 12-18 month diagnosis, that's all it was, a couple of weeks. And I remember those last 48 hours the most... because what I saw and what I felt, that is what nightmares are made of. Whilst I am absolutely grateful to have been there to say a proper goodbye, watching my Dad take his last breath is something that still makes me short of mine when I think about it. And I also remember choking on the words 'he's gone' when I answered my friends call that Thursday afternoon all those years ago. So now, fast forward fourteen years, to read the words that my dear old friend had just suddenly and unexpectedly lost her Mum, well, it flicked a switch. Sandwiched in bed, whilst my three loves slept, I wept. And so did mother nature. It had been a sunshine dream every day since arriving in Mexico but not that Thursday. It rained and it poured well into the night. And the wind and the waves... they were violent and angry and sad. Selfishly, I cried for a good hour before I made my great escape out of bed and called my friend. I needed to find some composure because I'm always the composed one... aren't I? The thing about our friendship is that no matter the distance or time or place, 'we' are always the same. Not many words were needed which I think was a relief, for both of us. After our call I did what makes sense to me. I went to burn off some of the pain and anguish. I adjusted the spin bike in the resort's gym and instead of playing my 'gym' mix I did what many of us crazy woman do in time of crisis, I played my 'depressing sure to make me cry even more' mix. And that's just what I did. I sat amongst a dozen strangers with my head dipped below my cap, my bike spun, and so did my head. And with every push of the pedal I felt my heartstrings pull. And I cried some more.

And tonight, just over a week later as I sit here and type this my friend is saying her final goodbyes to her Mum. I should be there and that breaks my heart a little more. I am so sorry that I am not.

I've felt very fragile this last week and some other news this morning (which hits too close to home to discuss right now) has only added to my fragility. I was just 16 years old when I lost my Dad and despite thinking I was so mature at the time, I was just a girl. Now I am grown, a woman, a wife, a mother, I think my heart is mourning the loss of my father all over again. It hurts just as much as an adult. Somehow, even more. And it is also mourning for those close to me who have lost and will lose. Because to know the pain that they will encounter is sometimes just a little too much.

Tonight whilst the girls were in the bath Allegra turned to me and asked 'You're never going to die, right Mum?!' I looked at her and said hopefully not until I'm really old and really wrinkly and she then replied 'well, it's ok Mum, because I will die too one day and then I will see you in heaven anyway, and Wolfgang too'. Wolfgang is my Dad's name. I'm not overly religious, but I hope she is right about the heaven part.

I'm not sure that this post really has an end point. I think I just needed to spill these words and a few more tears. For me, for my family, for my friend and for her Mum. Because sorrow shared is sorrow halved right? I've been counting my blessings a lot lately and I know I have so much to be grateful for. And it is the love of these blessings that will help heal the little cracks in my heart. So go and hug your loved ones. Tell them you love them. Every single day. Enjoy and live this precious life we have been given because it really is a gift. May your blessings keep your heart full... and in one piece xxx

Baking with Mrs Bouw: Homemade Chicken 'Bouw' Soup!

$
0
0
With the sudden onset of the much cooler weather here in Chicago (seriously, it was 30 degrees one day and an icy 13 degrees the next... um, hello Melbourne! hee hee), I was craving some good old homemade chicken noodle soup! Growing up, my Mum would make variations of this soup including one recipe where she would make her own egg noodles and another recipe where she would replace the noodles with home made semolina dumplings... yum! As a child, I particularly loved the dumplings and they were always the first thing I would ask for if I was feeling a little under the weather. It's also one dish that makes me feel a little closer if I am missing home :) I decided to replace to traditional noodles with mini farfalle because they are simply just easier for the girls to spoon out themselves (and because us 'Bouws' love our bows) ;) Keeping in mind that I had the girls to consider, I kept this recipe pretty simple but you can add other veggies if you please (i.e. parsnip or onions etc.) along with any other herbs and spices that take your fancy! Oh and I also cheated today and bought a roasted chook from Wholefoods instead of cooking my own (I usually use around three chicken marylands). I just love having a big pot of soup in the fridge as it means I usually get a couple of dinners out of eat (or maybe a lunch or two) and don't have the stress of cooking and cleaning up at the end of a busy day! Plus, homemade soup really is food for the soul isn't it :)
 

Home Made Chicken 'Bouw' Soup

Ingredients

1 tbs olive oil
1 litre of chicken stock
3 cubes of chicken bouillon (stock cubes) I always throw in a couple of these because they add a little more depth to the stock
4 large carrots, peeled and chopped (I added a few carrot hearts just for the girls)
1 small bunch of celery (roughly six long pieces), washed and chopped
1 cup fresh parsley, roughly chopped
4 cups of water
1 1/2 cups of mini farfalle or pasta of your choice
1 store bought rotisserie chicken
Salt and pepper to taste

Method

- Place olive oil and a splash of chicken stock in a large pot on low heat.

- Add the carrot and celery and sautee for roughly one minute.

- Add the remaining stock, bouillon cubes, parsley and water and simmer on low heat for 30-40 mins.

Note: this soup can be whipped up in no time but if you want that authentic homemade taste, the longer you simmer, the better. I usually make mine during the day and by dinner time the flavour are amazing.

- Once the both and vegetables have softened and have been simmering for a generous amount of time, turn up the heat a little and add you pasta.

- Remove skin from your chicken and then using your hands pull off all the meat you would like to add. I used the breast and thigh meat and left the wings and drumsticks for Mr B to gnaw on when he gets home ;)

- Again, for a more authentic feel, instead of using a knife I use my hands to break the chicken up in small bite sized/shred like pieces.

- Throw the chicken into the pot and reduce heat back down to a simmer and add salt and pepper to taste. I'm not usually a big fab of black pepper but I think it is a must in this recipe.

- Once the pasta has cooked through I like to turn it off and let it sit in the pot for a while and then slightly reheat again before serving. The true flavours will well and truly be there by this point.

- Served with a piece of fresh bread and butter.

- Enjoy! :)


Viewing all 89 articles
Browse latest View live