 Last week I shared with you all the details from Anya and Allegra's recent joint Birthday party including the cake I made for them! Well today, I am here to share my big, fat dirty little secret so that you too can create a showstopper cake with little effort! For the last fours years running I have made all of my girls' cakes from scratch (including Allegra's rather dodgy second Birthday cake less than two weeks after I gave birth to Anya... I remember it perfectly because I remember cursing and asking myself 'what on earth were you thinking taking on such a task with a crying, hungry newborn and zero sleep?!' haha!) and this year was no different. The only problem I faced was that we were only having a small gathering (probably a third of the size as previous years) so there was no way I was going to attempt another 2-3 tier cake, slaving in the kitchen for hours, only to have most of it go to waste. So I got to thinking... I can still have my cake and eat it too ;)
 |
| Allegra's 1st Birthday cake |
 |
| Allegra's 2nd Birthday cake |
 |
| Anya's 1st Birthday and Allegra's 3rd Birthday cake |
 |
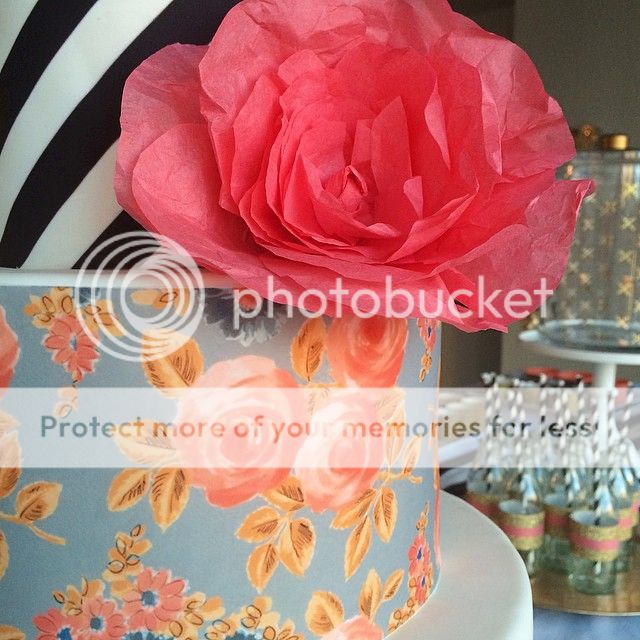
| This years cake for Anya's 2nd Birthday and Allegra's 4th Birthday! So what is my dirty little secret you ask? The two bottom tiers are fakes! Yep, tasty, yummy polystyrene goodness ha! I really had my heart set on creating a feature cake that would steal the show but like I said above, I couldn't justify so much cake for such a small gathering so it was Cake Dummyto the rescue! I still did all the decorating using fondant and then applied my amazing floral edible icing from Custom Icing made to match my invites (honestly, I couldn't give them a better wrap) but because I didn't have to factor in keeping the cake fresh, I could decorate the two bottom tiers days before the party... winning! I often hear people say that they are terrified to even attempt working with fondant but I can assure you it is so easy! There are loads of online tutorials that demonstrate how to apply fondant, here is just one video as an example. As for the top tier, I can assure you that WAS cake hee hee! I used my delicious White Chocolate Mud Cake recipe (refer below) which I also used for last years cake and baked two small cakes using the one mixture. I then added a layer of my vanilla buttercream frosting before stacking the two cakes on top of each other and then covered completely with the remainder of the vanilla buttercream frosting. Once the icing had set a little I then finished off by once again covering with fondant, the custom made black and white striped icing and then topped with the hand made paper flower I made. Because the cake is designed to be dense and super moist, I was able to make it two days in advance, once again eliminating the stress of baking and decorating like a mad woman in the lead up to the party! So the cake was finished on the Friday and the party was on the Sunday... I was relieved and thrilled with the result! So go on, fake it tip you make it...    |
White Chocolate Mud Cake
Ingredients
300g white chocolate (use Cadbury Dream white chocolate if you can)
200g butter
1 cup milk
3/4 cup caster sugar
2 teaspoons vanilla essence
2 large eggs, lightly beaten
2/3 cup self-raising flour
1 cup plain flour
Vanilla Buttercream Frosting
125g butter, lightly softened (I usually take it out of the fridge half an hour before I plan on using it)
2 1/4 cups icing sugar
1 teaspoon vanilla essence
* Note: I doubled this frosting recipe for the purpose of this cake.
Method
- Preheat oven to 160°C degrees Celsius (145°C if your oven is fan-forced).
- Grease and line you tin with baking paper.
- Grease and line you tin with baking paper.
- Place chocolate, butter, milk and sugar in a large saucepan over low heat, stirring frequently. Once chocolate and butter have melted, remove from heat and stir (I use a whisk) until the mixture is completely smooth. Set aside to cool until mixture is at room temperature.
- Once cooled, add vanilla essence and eggs to chocolate mixture and stir until well combined.
- Combine sifted flours together in a large bowl.
- Add the chocolate mixture to the egg and flour mixture in a three batches, stirring until combined after each addition and until mixture is completely smooth. This method will help prevent a lumpy mixture.
- Pour mixture into prepared tin.
- Baking time will vary depending on the size of your cake. If you use the entire mixture to make one cake, bake for approximately 1 hour and 10 minutes or until cooked when tested with a skewer. I made x2 smaller cakes so baked for approximately 50 minutes per cake.
- Important note: This recipe is designed to be super moist so if the skewer comes out clean or with moist crumbs (not gooey batter) attached, the cake is done! If not, return to the oven and bake for a further 5 minutes before testing again. The cake will also set once cooled (I promise!) so be sure not to over bake it as you don't want to dry it out!
- Once cooked through, remove from oven and allow to sit in the pan for at least 10 minutes before removing and placing on a cooling rack. I also always cover my baked goods with a clean tea towel to keep them nice and fresh!
Vanilla Buttercream Frosting
- Place butter in the bowl of an electric mixer and beat for roughly six minutes or until light and creamy.
- Add in icing sugar a half cup at a time and add vanilla half way through (food colouring is optional).
- Beat until well combined at piping or spreading consistency (approximately 5 minutes, you should be able to tell when it's done).
- Enjoy!


